Sage 300 Barcode Scanning: Setup, Workflows and Costs

Introducing barcode scanning in Sage 300 can help you improve inventory accuracy, speed up warehouse operations and reduce manual data entry. But how do you put it in place?
This guide explains what Sage 300 offers natively, what a third-party barcode solution can add, and how to implement scanning with ACCU-DART, starting with one warehouse workflow and expanding over time.
In this article
- What Sage 300 offers natively for the warehouse
- What third-party barcode solutions offer
- How to implement barcode scanning in Sage 300
- What to measure after go-live
- What barcode scanning for Sage 300 costs
- Before you choose: native integration vs WMS integration
- Frequently asked questions
What Sage 300 offers natively for the warehouse
Sage 300 is good at keeping inventory records. Receipts, shipments, transfers, counts, assemblies, and lot and serial numbers all live there.
The catch is that every one of those transactions is entered at a desk. Sage 300 has no way to do the work on the warehouse floor. In practice, that usually means:
- Pickers work from printed pick slips, and shipments are keyed in afterwards
- Receivers write quantities on the packing slip, and someone enters the receipt later
- Counts are written on worksheets and typed back in
- Nothing confirms the right item was picked until the customer calls
Sage 300 also can’t connect the barcodes printed on your products to your item numbers, and bin-level tracking needs a separate add-on.
That gap between the floor and the office is where most mis-ships and count errors come from. It’s the gap third-party barcode solutions are built to close.
What third-party barcode solutions offer
A barcode scanning solution for Sage 300 puts the work on a handheld scanner, so each step is confirmed by a scan and recorded in Sage 300 as it happens. Here’s what the most common workflows look like.
Receiving with a scanner
- Pick the purchase order on the scanner, or scan it from the packing slip.
- Scan each item as it comes off the truck. The scanner shows what’s expected and flags wrong items or extra quantities.
- Scan or enter lot and serial numbers where needed.
- Post the receipt. It’s created in Sage 300 and the stock is available to sell right away.
Picking and shipping with a scanner
- Open the sales order on the scanner.
- The scanner shows what to pick, how many, and from where.
- Scan each item as you pick it. A wrong item or quantity is flagged on the spot, not by the customer.
- Confirm the order. The shipment is created in Sage 300, and the invoice can be generated from it.
Counting with a scanner
- Scan the location or bin you’re counting.
- Scan each item and enter or scan the quantity.
- Counts go straight into Sage 300 worksheets. The office reviews the differences and posts, with no manual data entry required.
Assemblies with a scanner
- Scan each component as you pull it, along with its lot or serial number.
- For lots, the scanner can direct you to the one that expires first (FEFO, first expired, first out).
- Post the assembly. Sage 300 deducts the components and adds the finished item to stock.
Other common features
- Warehouse transfers: scan items out of one location and into another.
- Label and report printing: print item labels, shipping labels, packing slips and pick slips from the scanner.
- Lookups: scan an item to see stock levels, locations or open orders.
- Lot and serial validation: check that the right lot or serial number is scanned before it’s posted.
- Bin tracking: bin transfers, putaway and directed picking. It needs a bin tracking add-on for Sage 300.
How to implement barcode scanning in Sage 300
Here’s what setup looks like with ACCU-DART, from the first plan to fine-tuning after go-live.
Step 1: Make a plan
Start with the workflow that will have the biggest positive impact on your operations. A few common goals:
- Picking accuracy: fewer wrong items and quantities going out the door
- Lot and serial tracing: knowing exactly which lot or serial number went to which customer
- Faster receiving: stock available to sell the day it arrives
ACCU-DART is modular, so you don’t have to do everything at once. Most companies start with receiving and shipping, then add other workflows as they need them. It’s easier for your team to learn one process at a time, and you’re up and running faster.
Step 2: Sort out your barcodes
There are two ways to handle barcodes: map the barcodes your vendors and manufacturers already put on your products to your Sage 300 items, or create your own barcode labels for products that don’t have them.
Capturing existing barcodes. Map the barcodes on your products to your Sage 300 items. Sage 300 can’t do this on its own, so ACCU-DART handles it. You can map barcodes:
- On the scanner
- At a desk, one item at a time
- By uploading an Excel or CSV file
Adding barcodes. Print barcode labels for products without one and apply them during receiving or putaway, so every item has a barcode by the time it reaches the shelf. We’ll help you work out the best approach for your products and build labeling into your workflow.
Step 3: Install and connect ACCU-DART
Integrating ACCU-DART with Sage 300 takes about half a day. Working with your IT team and Sage 300 reseller, we:
- Configure the server
- Add ACCU-DART to Sage 300
- Set up your users
If everything goes smoothly you can be up and running within a week.
Step 4: Train your team
With ACCU-DART installed, the next step is getting your team comfortable with the scanners. We do this by providing:
- Live one-on-one training with your team, on the devices they’ll use
- Step-by-step documentation and videos for each workflow
Step 5: Test in your sample company
Before going live, we recommend running your workflows in a Sage 300 sample company. Receive a purchase order, pick an order, count a shelf. It lets the team get comfortable with the scanners without touching real inventory, and it’s a safe place to try the awkward cases: a partial receipt, a backorder, a damaged label.
Step 6: Go live
Pick a quiet week, not month-end or your busy season, and start using ACCU-DART for real. Our team and your reseller are on hand for any issues that come up.
Step 7: Refine
This is one of the most important steps, because no setup is perfect on day one. After a few weeks of real use, you’ll start to spot steps that could be quicker or screens that don’t quite match how your team works. That’s when we adjust ACCU-DART to fit your workflow, whether that’s simplifying a screen or adding a prompt. The goal is to make your team as efficient as possible.
Once the first workflow is running smoothly, pick the next one and repeat.
What to measure after go-live
A few weeks after go-live is a good time to look at what’s changed. Some of it shows up in your numbers, and some of it you’ll hear from the people who work with the warehouse every day.
Real-time data in Sage 300
Every receipt, pick and transfer is posted to Sage 300 the moment it’s scanned, instead of waiting for someone to key in the paperwork. That means the stock levels and order status you see in Sage 300 are current. Ask your sales and purchasing teams whether they trust those numbers more when promising orders or reordering.
More accurate orders
Look for fewer orders shipped with the wrong item or quantity, and fewer returns caused by picking errors. Ask your sales and customer service team whether fewer customers are calling about problems with their orders.
Faster receiving and shipping
Check how quickly new stock shows up in Sage 300 after it arrives, and how many orders go out the same day. Ask your warehouse lead whether things are moving faster.
Less paperwork
Track how many hours a week go into keying warehouse paperwork into Sage 300. Ask your office and accounting team how much of that work has gone away.
If you can, write down a few of these numbers before you go live, so you have something to compare against.
What barcode scanning for Sage 300 costs
The cost comes in three parts: the hardware, the software licenses, and the time to set it up. All prices are in US dollars.
Hardware
ACCU-DART runs on Android and iOS devices. Most of our customers use rugged Android handhelds with a built-in scanner, from brands like Zebra, Datalogic, Honeywell and Munbyn. Here’s roughly what to budget:
- Handheld scanners: about $700 to $3,000 each. Touchscreen models sit at the low end, and keypad models built for heavy all-day use or cold storage sit at the high end.
- Label printer: about $800 for a desktop thermal label printer, if you’ll print your own labels.
- Labels and ribbons: an ongoing cost that depends on how many labels you print.
You’ll want one handheld for each person scanning at the same time. If your Wi-Fi doesn’t reach every part of the warehouse, budget for an extra access point or two.
Software licenses
ACCU-DART is priced per module, per year, plus a per-user license:
- Modules: $750 to $1,250 per module, per year
- User licenses: $350 per user, per year
Because you only pay for the modules you use, costs grow with you. A small setup, with one module and a couple of users, starts at around $1,500 to $2,000 a year. Lot, serial and bin tracking can be added to the modules that need them.
Implementation
Implementation is a one-time cost of $1,500 to $3,000. It covers installing ACCU-DART, connecting it to Sage 300, setting up your workflows and training your team. Once that’s done, adding modules later typically comes with no extra implementation cost, since the groundwork is already in place.
Total cost
Here’s what a typical first year might look like for a company with three modules and six people scanning:
| Item | Cost |
|---|---|
| Hardware: six handhelds at about $700 each, plus a label printer | About $5,000 |
| Software licenses (per year) | About $5,000 |
| Implementation | $1,500 to $3,000 |
| First year total | About $11,500 to $13,000 |
After the first year, the ongoing cost is mainly the software licenses, around $5,000 a year.
Before you choose: native integration vs WMS integration
One of the most important questions to ask about any barcode solution is where your inventory data lives. Solutions connect to Sage 300 in one of two ways:
- Native integration: scans post directly into Sage 300. There’s one set of numbers, updated as you work.
- WMS integration: a separate warehouse management system (WMS) keeps its own inventory and syncs with Sage 300. That can add deeper warehouse features, but the two systems have to stay in step, and when a sync fails or runs late, the numbers stop matching.
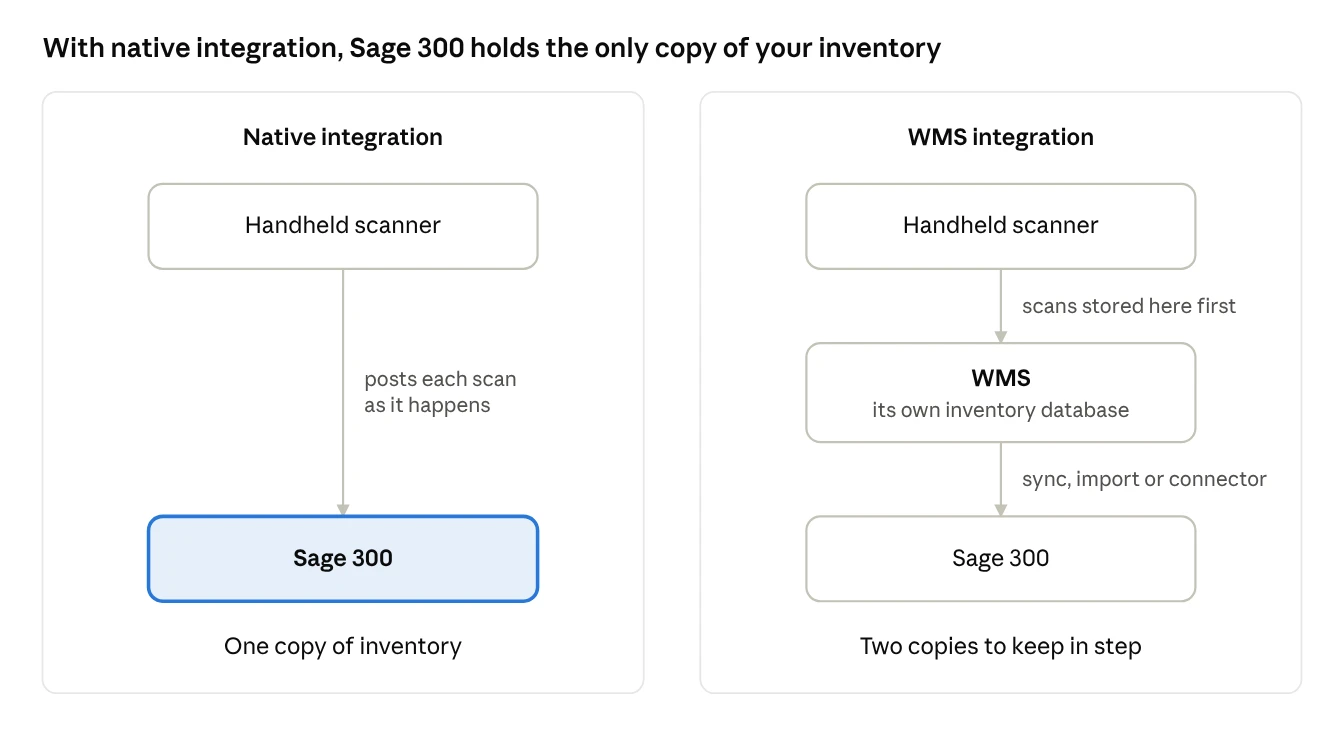
For most Sage 300 companies, one set of numbers is simpler to live with. ACCU-DART is a native integration: it connects through Sage 300’s own software development kit (SDK) and keeps no separate inventory database.
Frequently asked questions
Does Sage 300 have barcode scanning built in?
Not for the warehouse floor. Sage 300 records receipts, shipments, transfers and counts, but they’re entered at a desk. Scanning on a handheld comes from a third-party add-on.
How long does it take to set up?
Integrating ACCU-DART with Sage 300 takes about half a day, and most companies are up and running within a week.
Can I start with just one workflow?
Yes. ACCU-DART is modular, so you can start with one workflow, such as receiving or shipping, and add more later.
What if my products don’t have barcodes?
You can print barcode labels for them, for example with our free barcode label generators, and apply them as part of receiving or putaway.
What is barcode mapping?
It links the barcodes printed on your products, from manufacturers and suppliers, to your own Sage 300 item numbers. Sage 300 can’t do this on its own. ACCU-DART lets you map barcodes on the scanner, at a desk, or by uploading an Excel or CSV file.
Does it work with lots and serial numbers?
Yes. Lot and serial tracking can be added to the modules that need them.
What devices can I use?
ACCU-DART runs on Android and iOS. Most of our customers use rugged Android handhelds.
Does it work with my version of Sage 300?
ACCU-DART works with all versions of Sage 300.
Do I need Wi-Fi?
Yes, for most workflows. ACCU-DART posts each scan to Sage 300 as it happens, so scanners need a signal where people work. Physical counts can also be done offline.
Wrapping up
Adding barcode scanning to Sage 300 doesn’t have to be a big project. Pick the workflow that causes the most trouble, sort out your barcodes, and start there. Once it’s running smoothly, add the next one.
If you’d like to see how this would work with your setup, we’re happy to walk you through it.